Reparenting

There are situations were you want to change the MuuriComponent parent of the dragging Item while a drag is occurring. Here's an example in the gif below.
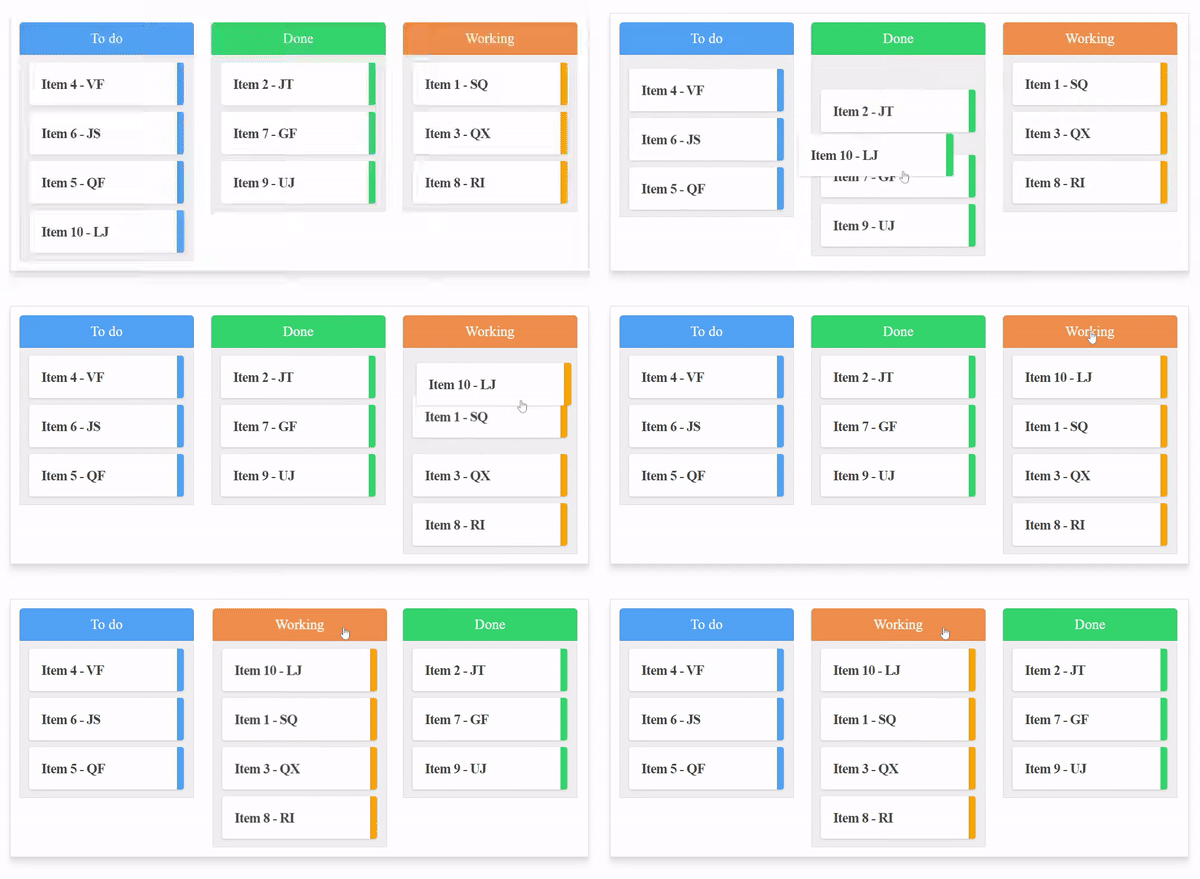
The implementation of this feature in Muuri-react manages to have the following characteristics

  • The component is not unmounted / re-mounted (best performance).
  • Items don't have to be configured (very easy to implement).
  • The internal state of the Item is maintained (best developer experience).

How it works ๐Ÿ“–

There are two types of events:

  • When the Item is dragged to another MuuriComponent (but not released).
  • When the Item is released in another MuuriComponent.

You can interact with the first event in the Item via the useGrid hook. Instead you have to interact with the second event through the MuuriComponent onSend prop.

This division allows you to have the best performance and a better user experience. In the example of the gif, you can figure out which grid the Item is on, for changing the color of the right strip, only re-rendering the Item and not all the MuuriComponents.

Rules ๐Ÿ“œ

There are a few simple rules for implementing reparenting

  • The Items must have unique keys between them, even if they do not share the same MuuriComponent parent.
  • You have to choose the MuuriComponents of which the Item can be a child by providing group ids.
  • When an Item changes parent you have to sync the state with the onSend prop.
<MuuriComponent
onSend={(payload) => {
// Sync the state and
// Re-render the MuuriComponents...
}}
/>

Usage ๐Ÿ“–

let's try to reproduce a part of the code of the example in gif, we focus on writing the onSend function later.

const App = () => {
// Items.
const [items, setItems] = useState({
todo: [{key: '1', text: 'Shopping'}],
done: [{key: '2', text: 'Homework'}],
});
// Items to children.
const children = {
todo: items.todo.map((props) => <Item {...props} />),
done: items.done.map((props) => <Item {...props} />),
};
return (
<>
{/* Items marked as 'todo' */}
<MuuriComponent
dragEnabled
// The unique id of the MuuriComponent.
id={'TODO'}
// The groups of the MuuriComponent.
groupIds={['LIST']}
// The item can only be dragged (and sorted) into
// MuuriComponents of the group 'LIST'.
dragSort={{groupId: 'LIST'}}
// Will be done later.
onSend={/* ... */}>
{children.todo}
</MuuriComponent>
{/* Items marked as 'done' */}
<MuuriComponent
dragEnabled
id={'DONE'}
groupIds={['LIST']}
dragSort={{groupId: 'LIST'}}
onSend={/* ... */}>
{children.done}
</MuuriComponent>
</>
);
};

When an Item is dragged to another MuuriComponent as in the gif, we must update the Items state.

The MuuriComponents must re-render with their updated children, considering that the Item that has been dragged must be inserted in the new MuuriComponent of which it is now a child. Let's create the onSend method for the first MuuriComponent.

// ...
<MuuriComponent
dragEnabled
id={"TODO"}
groupIds={["LIST"]}
dragSort={{ groupId: "LIST" }}
onSend={({ key }) => {
// The transferred item.
const transferredItem = items.todo.find(item => item.key === key);
// Update the items categories.
const todo = items.done.filter(item => item !== transferredItem);
const done = items.todo.concat(transferredItem);
// Set the new state.
setItems({ todo, done });
}}
>

It is possible to simply insert the Item at the bottom as the last component (items.done.concat(transferredItem)), without worrying about the position in which it was dragged. To keep the code cleaner we can create a function that works for each MuuriComponent and keep it in a different file.

export function getOnSend(setItems) {
return function onSend({key, fromId, toId}) {
// The id of the MuuriComponent that is sending the item.
fromId = fromId.toLowerCase();
// The id of the MuuriComponent that is receiving the item.
toId = toId.toLowerCase();
// Sync the state with the items.
setItems((items) => {
// New items object that we can modify.
const newItems = {...items};
// The transferred item.
const transferredItem = newItems[fromId].find((item) => item.key === key);
// Updates the two categories in which the item has been traded.
newItems[fromId] = newItems[fromId].filter(
(item) => item !== transferredItem
);
newItems[toId] = newItems[toId].concat(transferredItem);
return newItems;
});
};
}

We can now use the method for each MuuriComponent.

import { getOnSend } from './utils';
// ...
<MuuriComponent
dragEnabled
id={"TODO"}
groupIds={["LIST"]}
dragSort={{ groupId: "LIST" }}
onSend={getOnSend(setItems)}
>

Hook: useGrid ๐Ÿ”Œ

The useGrid hook allow you to know which MuuriComponent the Item is on. See more here.

import {useGrid} from 'muuri-react';
const Item = ({text}) => {
const {id} = useGrid();
// Change the color based on the id.
const color = id === 'TODO' ? 'blue' : 'green';
return (
<div className={`item color-${color}`}>
<div className="item-content">{text}</div>
</div>
);
};

Exclusive drop ๐Ÿšซ

You can do some advanced stuff and control within which MuuriComponents a specific Item can be sorted and dragged into. To do that you can provide the groupId of these MuuriComponents in the dragSort prop.

In the example below you can send an Item from the first MuuriComponent to the second one, but not the opposite.

<MuuriComponent groupIds={["A"]} dragSort={{ groupId: 'B' }} />
<MuuriComponent groupIds={["B"]} dragSort={{ groupId: 'B' }} />

If you want to implement a more complex logic, different for each Item, you can provide a function which receives the dragged Item as its first argument and should return an array of Muuri instances. You can easily access these instances by providing ids and groupIds to the muuriMap.

import {muuriMap} from 'muuri-react';
// Custom logic.
<MuuriComponent
id={'id'}
groupIds={['groupId']}
dragSort={(item) => {
// Dragged component.
const key = item.getKey();
const data = item.getData();
const props = item.getProps();
// Some Muuri instances.
const currentGrid = item.getGrid();
const gridsArray = muuriMap.getGroup('groupId');
const grid = muuriMap.get('id');
// Implement your logic...
// Return an array of Muuri instances into
// which the item can be dragged and sorted.
return anArrayOfGrids;
}}
/>;

Manual reparenting ๐Ÿ‘ท

Reparenting is performed following a drag and drop. However, you can run it manually through the Muuri instance. This way group control is not enabled and you have to call onSend manually. See more about Muuri here.

const App = () => {
// Grids.
const todoGrid = useRef();
const doneGrid = useRef();
// Change the parent of the first 'todo' item.
const changeParent = () => {
// Move the first item of todoGrid as the last item of doneGrid.
todoGrid.current.send(0, doneGrid.current, -1);
// Sync the state.
onSend();
};
return (
<>
<button onClick={changeParent} />
{/* MuuriComponents */}
<MuuriComponent ref={todoGrid}>{children.todo}</MuuriComponent>
<MuuriComponent ref={doneGrid}>{children.done}</MuuriComponent>
</>
);
};

Note that you can also access the grids with the muuriMap.

import {muuriMap} from 'muuri-react';
function send(fromGridId, toGridId, item, position) {
// Get the grids.
const fromGrid = muuriMap.get(fromGridId);
const toGrid = muuriMap.get(toGridId);
// Send the item.
fromGrid.send(item, toGrid, position);
}

How is that possible? ๐Ÿคจ

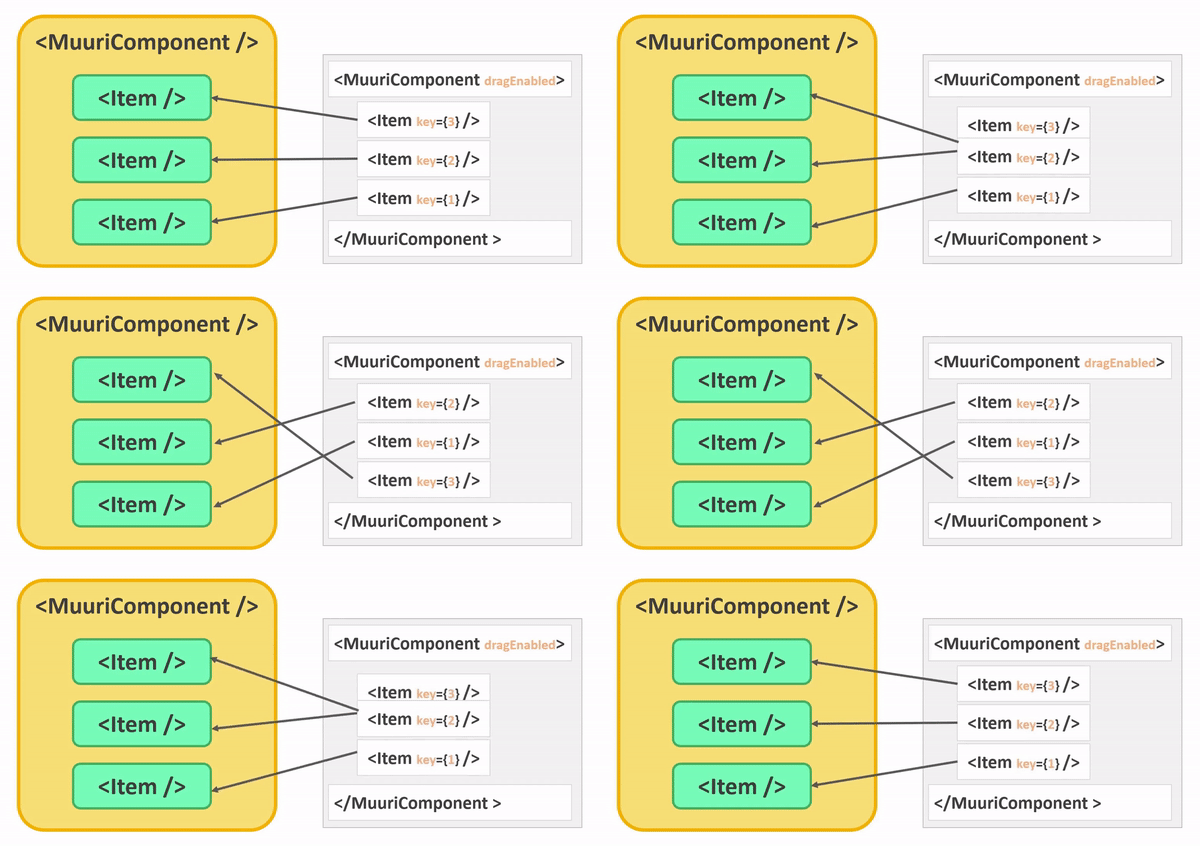
You may have wondered how it is possible that, during the reparenting, the Item can be inserted among the children of the new MuuriComponent in any position (for example at the bottom), without worrying about the position in which it was dragged. This is because the order of the Item components is separated from the order of the elements in the DOM. This allows to have a very simple implementation (In addition the Muuri-react diffing algorithm is optimized for insertions at the bottom).